bgm: https://music.163.com/#/song?id=490182455&userid=361029804
剧场版《NO GAME NO LIFE 游戏人生 ZERO》主题曲

前言及介绍#
在当今的前端开发中,浮动元素扮演着越来越重要的角色。它们能够为用户提供额外的交互和信息,同时不会影响页面的整体布局。而 Floating UI 就是一个为了方便定位和创建浮动元素的 JavaScript 库。通过它,你可以轻松地 控制浮动元素的位置和交互效果,从而提升用户体验。
如果你正在寻找一个简单易用的浮动元素解决方案,或许 Floating UI 不是你的最佳选择,该库的主要目标是提供锚点定位的功能,而不是提供预建样式或其他高级交互效果。但如果你是熟练掌握 React 并希望使用这样高度自定义的库,你就可以更好地使用它。
这个库是有意 “低级” 的,它的唯一目标是提供 “锚点定位”。把它想象成一个缺失的 CSS 特性的 polyfill。不提供预建样式,用户交互仅适用于 React 用户。
如果您正在寻找开箱即用的简单功能,您可能会发现其他库更适合您的用例。
写这篇文章我更愿意称之为在 React 中使用 Floating UI 的经验分享,特别是在 React 中使用该库的方法,而不是教程,因为实际运用的时候发现 Floating UI 的文档和示例已经相当详尽,但苦于 Floating UI 的中文资料寥寥无几,所以自己沉淀一些方便日后回忆,也希望能为需要的人提供一些帮助和参考。(当然,最快的还是直接去看英文文档和例子,搜索 API 的使用)
安装#
你可以通过包管理器或 CDN 来安装 Floating UI。如果你使用 npm、yarn 或 pnpm,你可以运行以下命令:
npm install @floating-ui/dom
如果你使用 CDN,你可以在你的 HTML 文件中添加以下标签:
<script src="https://cdn.jsdelivr.net/npm/@floating-ui/dom"></script>
更多请看:Getting Started | Floating UI
React 中安装#
在 React 中安装只需要安装 @floating-ui/react 这个包即可
yarn add @floating-ui/react
Popover#
在本文中,我将分享如何使用 Floating UI 来创建一种常见的浮动 UI 组件 ——Popover(弹出框)。Popover 是一种常见的浮动 UI 组件,它通常在用户悬停或点击某个元素时显示,以提供额外的信息或选项。
案例演示#
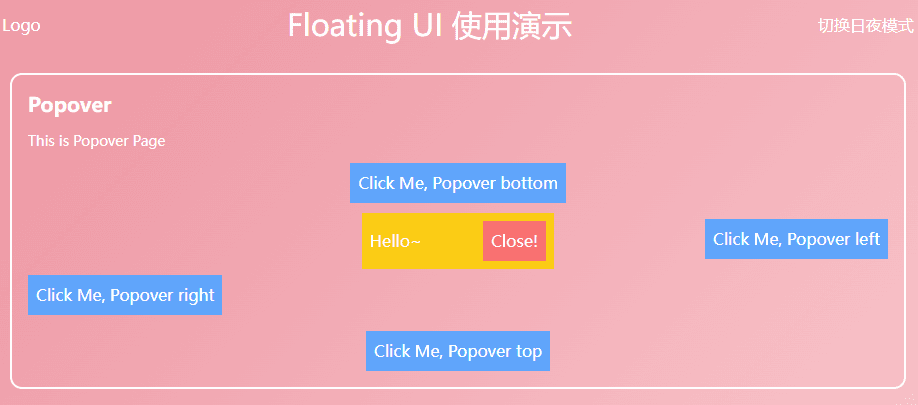
通过以下学习,可以轻易构建一个点击弹出的气泡框 / 弹出层,如图。
Demo 演示 👉 CodeSandbox

useFloating#
首先就是核心 hook —— useFloating
useFloating hook 为浮动元素提供定位和上下文。我们需要传递一些信息:
open:弹窗的打开状态。onOpenChange: 弹窗打开或关闭时将调用的回调函数。floating-ui 内部将使用它来更新它们的isOpen状态。placement:浮动元素相对参考元素的位置,默认位置是'bottom',但您可能希望将工具提示放置在与按钮相关的任何位置。为此,Floating UI 具有placement选项。- 可用的基本位置是
'top'、'right'、'bottom'、'left'。 - 这些基本位置中的每一个都以
-start和-end的形式对齐。例如,'right-start'或'bottom-end'。这些允许您将工具提示与按钮的边缘对齐,而不是将其居中。
- 可用的基本位置是
middleware:将中间件导入并传递到数组,以确保弹窗保留在屏幕上,无论它最终被放置在哪里。autoPlacement当您不知道哪个位置最适合浮动元素,或者不想明确指定它时,这个中间件很有用。- Middleware | Floating UI 其他中间件,可以看文档,包括 offset (设置偏移) 、arrow (添加小箭头) 、shift(沿着指定的轴移动浮动元素以使其保持可见)、flip(翻转浮动元素的位置以使其保持可见)、inline (改进跨多行的内联引用元素的定位) 等有用的中间件
whileElementsMounted:只有在参考元素和浮动元素都挂载好的情况下,才会在必要时更新位置,以确保浮动元素保持锚定在参考元素上。- autoUpdate 如果用户滚动或调整屏幕大小,浮动元素可能会与参考元素分离,因此需要再次更新其位置以确保其保持锚定状态。
import { useFloating, autoUpdate, offset, flip, shift } from '@floating-ui/react';

function Popover() {
  const [isOpen, setIsOpen] = useState(false);

  const { x, y, strategy, refs, context } = useFloating({
    open: isOpen,
    onOpenChange: setIsOpen,
    middleware: [offset(10), flip(), shift()],
    placement: 'top',
    whileElementsMounted: autoUpdate,
  });
}
Interaction hooks - useInteractions#
使用
useInteractions传入一个配置对象,可以使浮动元素能够拓展打开、关闭行为或被屏幕阅读器访问等额外功能。在这个例子中,useClick()添加了在单击引用元素时切换弹出窗口打开或关闭的功能。useDismiss()添加了当用户按下esc键或在弹出框外按下时关闭弹出框的功能。useRole()将dialog的正确ARIA属性添加到弹出框和引用元素。最后,useInteractions()将他们所有的 props 合并到 prop getters 中,可以用于渲染。[^1]
一些配置的对象。使浮动元素能够拓展打开、关闭行为或被屏幕阅读器访问等额外功能。
import {
  // ...
  useClick,
  useDismiss,
  useRole,
  useInteractions,
} from '@floating-ui/react';

function Popover() {
  const [isOpen, setIsOpen] = useState(false);

  const { x, y, reference, floating, strategy, context } = useFloating({
    open: isOpen,
    onOpenChange: setIsOpen,
    middleware: [offset(10), flip(), shift()],
    whileElementsMounted: autoUpdate,
  });

  const click = useClick(context);
  const dismiss = useDismiss(context);
  const role = useRole(context);

  // Merge all the interactions into prop getters
  const { getReferenceProps, getFloatingProps } = useInteractions([click, dismiss, role]);
}
useClick()添加了在单击引用元素时切换弹出窗口打开或关闭的功能。useDismiss()添加了当用户按下esc键或在弹出框外按下时关闭弹出框的功能。useRole()将dialog的正确ARIA属性添加到弹出框和引用元素。
最后,useInteractions() 将他们所有的 props 合并到 prop getters 中,可以用于渲染。将他们所有的 props 合并到可用于渲染的 prop getters 。
Rendering#
现在我们已经设置了所有的变量和 hook,我们可以渲染我们的元素了。
function Popover() {
  // ...
  return (
    <>
      <button ref={refs.setReference} {...getReferenceProps()}>
        Reference element
      </button>
      {isOpen && (
        <FloatingFocusManager context={context} modal={false}>
          <div
            ref={refs.setFloating}
            style={{
              position: strategy,
              top: y ?? 0,
              left: x ?? 0,
              width: 'max-content',
            }}
            {...getFloatingProps()}
          >
            Popover element
          </div>
        </FloatingFocusManager>
      )}
    </>
  );
}
getReferenceProps&getFloatingProps由useInteractions返回传播到相关元素上。它们包含诸如onClick、aria-expanded等相关的 props。<FloatingFocusManager />是 管理模态或非模态行为( modal and non-modal ) 的 弹出框焦点 的组件。它应该直接包裹浮动元素,并且 只在 popover 也被渲染时才被渲染。FloatingFocusManager——FloatingFocusManagerdocs.
Modal and non-modal behavior 模态或非模态行为#
Modal and non-modal behavior 模态或非模态行为
在上面的例子中我们使用了非模态的焦点管理,但是弹出框的焦点管理行为可以是模态的也可以是非模态的。它们的区别如下:
Modal 模态#
- 弹出窗口及其内容是 唯一可以接收焦点 的元素。当弹出窗口打开时,用户无法与页面的其余部分(屏幕阅读器也不能)交互,直到弹出窗口关闭。
- 需要一个 明确的关闭按钮(尽管它可以在视觉上隐藏)。
此行为是默认行为:
<FloatingFocusManager context={context}>
  <div />
</FloatingFocusManager>
Non-modal 非模态行为#
- 弹出窗口及其内容可以获得焦点,但用户仍然可以与页面的其余部分进行交互。
- 当在其外部进行 Tab 键时,弹出窗口会在失去焦点时自动关闭,并且自然 DOM 顺序中的下一个可聚焦元素获得焦点。
- 不需要明确的关闭按钮。
此行为可以使用 modal prop 进行配置,如下所示:
<FloatingFocusManager context={context} modal={false}>
  <div />
</FloatingFocusManager>
完整代码#
经过亿点点优化,就能简简单单造出这么一个 Popover 组件啦~
import {
  FloatingFocusManager,
  Placement,
  autoUpdate,
  useFloating,
  useInteractions,
  shift,
  offset,
  flip,
  useClick,
  useRole,
  useDismiss,
} from '@floating-ui/react';
import { cloneElement, useEffect, useId, useState } from 'react';

type PopoverProps = {
  disabled?: boolean;
  open?: boolean;
  onOpenChange?: (open: boolean) => void;
  render: (props: { close: () => void }) => React.ReactNode;
  placement?: Placement;
  children: JSX.Element;

  className?: string;
};
const Popover = ({ disabled, children, render, placement, open: passedOpen, onOpenChange }: PopoverProps) => {
  const [open, setOpen] = useState(false);
  const { x, y, reference, floating, strategy, context } = useFloating({
    open,
    onOpenChange: (op) => {
      if (disabled) return;
      setOpen(op);
      onOpenChange?.(op);
    },
    middleware: [offset(10), flip(), shift()],
    placement,
    whileElementsMounted: autoUpdate,
  });
  const { getReferenceProps, getFloatingProps } = useInteractions([useClick(context), useRole(context), useDismiss(context)]);

  const headingId = useId();

  useEffect(() => {
    if (passedOpen === undefined) return;
    setOpen(passedOpen);
  }, [passedOpen]);

  return (
    <>
      {cloneElement(children, getReferenceProps({ ref: reference, ...children.props }))}
      {open && (
        <FloatingFocusManager context={context} modal={false}>
          <div
            ref={floating}
            style={{
              position: strategy,
              top: y ?? 0,
              left: x ?? 0,
            }}
            className="z-10 bg-yellow-400 p-2 outline-none"
            aria-labelledby={headingId}
            {...getFloatingProps()}
          >
            {render({
              close: () => {
                setOpen(false);
                onOpenChange?.(false);
              },
            })}
          </div>
        </FloatingFocusManager>
      )}
    </>
  );
};
export default Popover;
结语#
下一次将介绍Dialog | Floating UI 的创建及封装,包括 FloatingPortal 和 FloatingOverlay 的介绍,它与弹出框有类似的交互,但有两个主要区别:
- 它是模态的,并在对话框后面呈现一个背景,使后面的内容变暗,使页面的其余部分无法访问。
- 它在视口中居中,不锚定到任何特定的参考元素。
非常推荐大家去阅读 Floating UI 官方文档,它的思想我非常喜欢,无论是中间件还是 hook 的抽象程度